Apr 172013
 

While you’re all probably sick of hearing me lament about my Mom’s recipe collection, I’m afraid there simply isn’t anything else to report on since Winter keeps hanging on in the Northwoods, and until it releases us from it’s icy tentacles and I can drone on mercilessly about planting seeds and cursing the squirrels for digging up my flower bulbs, you gets what you gets.

So with that being said, I’m going to share with you the story of the mistaken recipe.

Well, not mistaken so much as a mistake.

While rifling through the mounds of culinary masterpieces strewn all over my table looking for personal favorites from the youth, I happened upon one dish that looked very familiar.  I remember Mom making this dish, and could even see it in my minds’ eye, but something just seemed off about it.  But despite my misgivings and unable to find another that would disprove my feelings, I put it into the “keep and try” pile and moved on.

Then came the day to pick one from the pile, and wouldn’t you know the first one I grabbed was that same recipe that seemed off, but I thought “What the hell, let’s give ‘er a try!

Pizza Casserole

Let me tell you, when I threw all of these ingredients together I just knew that I had the wrong recipe.  But, not having anything else to go with and having the dish already prepared there was no turning back.

But still I had this nagging feeling that I had a different version somewhere (and when I get those nagging feelings I don’t give up searching until I find what I’m after!).

Pizza Hot Dish

So I rummaged though my “basket-o-recipes” (which, by the way, is surprisingly similar to my Mom’s method of recipe filing) and low and behold there it was.  And in my Mom’s own handwriting no less!!

Unfortunately, the mistaken recipe was doing its requisite time in the fridge by now before it’s trip to the oven, so there was no chance in changing teams mid-game.

So, does this story have a happy ending?

Pizza Casserole

I am happy to say… yes!

While I have to admit that I was a little skeptical about how the noodles would turn out and that I may have had too much pizza sauce, the overall finished product was delicious.

Moral of the story:  Just because it wasn’t the recipe I was looking for doesn’t mean it can’t turn out to be just as good.

After all, it did come from Mom’s collection, so I shouldn’t have been surprised.


Apr 142013
 

My whole goal of packing up my Mom’s recipes and bringing them back with me on my last trip down to my hometown was to go through them and find the ones that she used to prepare when I was growing up and put together some sort of cookbook for my kids and siblings.

Recipes 2

I wanted to preserve these delicious memories somehow, someway so that I could share a little piece of my childhood with those I love.

Now that I have all those little notecards and newspaper clippings in my possession, I feel a little overwhelmed and unsure where to start.

Recipes 3

I mean, there are literally hundreds of recipes to go through!

And while I could have taken all of her cookbooks, I held myself back to just those that tugged at my heartstrings the most, 2 of which are vintage and used the most by her.

Cookbooks

Can you see all the love that they have had?

Now here is the million dollar question that I’m hoping you all can help me with: does anybody know of some software that is available for me to organize this mess collection into some sort of cookbook?  I’ve looked at Shutterfly but I’m hoping that there are other options out there that will allow me creative reign without busting my wallet.

I know you guys are smarter than me when it comes to this stuff, so please, please, pleeeease lend me a hand here.

Alrighty, now that I’ve done the necessary groveling, it’s time to get cooking!


Feb 182013
 

Saturday morning cooking shows are a great source of new and interesting recipes.

And I’m always shopping for something new to bake that doesn’t call for ingredients that I can’t pronounce or find in my neck of the woods.

So when I saw a recipe* on Trisha’s show a couple weeks ago I got very excited because a) it only had 4 ingredients in it and b) it was simple to make.  As anyone knows, these are high priorities for me.

Problem was, I didn’t have the main ingredient.  *sigh*

No worries because there was an alternate that could be used that I did have, so I got to make my own version AND give it a new name.

Without further ado, let’s get started shall we?

Our cast of characters are:

  • Cooking spray
  • 15 graham crackers
  • 2 sticks (1 cup) butter
  • 1 cup light brown sugar
  • 10 ounces semisweet chocolate chips

Here’s what you’re gonna do:

Preheat oven to 425 degrees F.

Crackers

Line 1 large or 2 small jelly-roll pans with aluminum foil, spray with nonstick spray and arrange the graham crackers upside down in a single layer.

I broke my crackers in half, which in hindsight wasn’t such a great idea.  Leave them whole.  Trust me on this.

Butter

In a medium saucepan, melt the butter and brown sugar together and boil until it turns a caramel color, a few minutes.

Boil

Make sure you stir this constantly so that it won’t burn.  You are making caramel, after all.

Caramel

Remove from the heat and pour over the crackers, covering them evenly.

Put the jelly-roll pan in the oven and bake for 3 to 5 minutes, or until just bubbly, watching carefully.

Chips

Remove from the oven and pour the chocolate chips over the crackers.

Chocolate

When the chips melt a bit, spread them over the crackers with a knife.

Transfer the pan to the freezer for 15 to 20 minutes, or until completely cold.

Bars

They will form one big sheet.  Break up into pieces.  Store in an airtight container.

Bars 2

Didn’t I tell you these were simple?  And what a nice change from always grabbing a candy bar for a quick chocolate fix.


* The original recipe calls for saltines for that sweet/salty combination which I’m definitely going to try the next time I have an overabundance of saltines laying around.


Feb 152013
 

I don’t know when it happened, but it seems lately that this has turned into a foodie blog.

Not that that’s a bad thing, but I wouldn’t exactly call myself a foodie.

Love to make it, love to eat it, just not an expert at it.

But since we’re on the subject….

Rick reminded me the other day that we had a plethora of Blackberries in the freezer that we had picked last summer, and he had been craving things that he wanted me to bake with them.

I like subtle hints, don’t you?

Berries

Actually, he was right.  We did have a stockpile of Blackberries.  So much in fact that they took up the whole bottom drawer of the freezer.

And what better to put them into but muffins!

I have a recipe that I used when I baked at my store that everyone still raves about after almost 4 years.  Since it’s not “my” recipe (found it on the web) I’ve never held back in sharing it with whomever wants it.

And today, I’m gonna share it with you!

The cast of characters are:

  • 1/2 cup butter
  • 1 1/4 cups white sugar
  • 2 eggs
  • 2 cups all-purpose flour
  • 2 teaspoons baking powder
  • 1/2 teaspoon salt
  • 1/4 cup milk
  • 2 1/2 cups fresh fresh blueberries
  • 1/4 cup white sugar

Now this is usually the time when I step in and tell you that I didn’t follow the ingredient list exactly, but for this recipe that is not the case.  I have to admit that this one time every amount and ingredient works perfectly.

HOWEVER, there are two things that you can do differently and it won’t change the outcome one iota.  First, you don’t have to use fresh blueberries.  If you have frozen, just thaw them out and you’re good to go.  Don’t have blueberries?  No problem!  Use whatever fruit you have available:  blackberries, raspberries and peaches are fantastic!!  I always add a little of the juice to the mix to give it just a little more kick.

And that extra 1/4 cup of white sugar is to sprinkle on the top of the muffin before baking to give it a nice sugary crunch.  I’ve found that course sugar (also known as decorating sugar) is really the way to go.  I buy it from the bakery department at our local grocery store for little or nothing.

All right, on to the assembly.

Preheat oven to 375 degrees.  Grease and flour muffin pans or use paper liners.

In a large bowl, cream butter and 1 1/4 cup sugar until light and fluffy.  Add eggs one at a time and mix in.

In a separate bowl mix flour, baking powder and salt.  Add flour mixture, alternating with milk.  Mash 1/2 cup berries and stir into batter.  Fold in remaining berries.

Fill muffin cups and sprinkle with the remaining 1/4 cup of sugar (or sprinkle with a generous pinch of course sugar).

Bake at 375 for 30 minutes.  Remove from oven and wait 20 minutes to remove from pans.

I have to pull out my rebel baking card once again and tell you that I didn’t follow their baking directions to the letter.  If you are using regular muffin tins, 30 minutes is going to be wayyyyyy to long.  I’d go 20 minutes to start.  When the tops start getting brown, stick a toothpick in the center and if it comes out clean, they are done.  If you are making the big “Texas” size muffins, then 30 minutes is about right.

Muffins

As for me, I’ve been on a muffin top kick lately so mine are done after 11-12 minutes.

Also, don’t wait 20 minutes to pull them out of the pan.  They will continue to cook while sitting in that hot metal and you will end up with an over-cooked, dry muffin.  Pop those babies out of there after a couple minutes and cool on a wire rack.  They will be hot, so please be careful!

Muffins 2

Oh.  My.  Goodness.

Is your mouth watering as much as mine?

Believe me when I tell you that a single batch of these will not last long, because your family will devour them as soon as they are cool enough to eat.


Feb 042013
 

As a person who makes their own bread, I’ve got a few recipes that have always worked wonderfully for me throughout the years.

That is, until now.  Or should I say up until a few months ago.

Actually, I really shouldn’t blame it on the recipes… maybe I should blame it on the yeast.  On second thought, that really isn’t fair because I can’t really pin it on any one thing that is causing me such frustration with producing less-than glorious loaves of bread.  Mainly wheat bread, which is the staple in our house.

There are many factors that can cause such catastrophic problems such as heavy loaves from under-rising.  Whole wheat flour is a bugger to work with, and I’ve learned over the years when the best wheat flour is in season (yes, there is a season:  winter wheat vs. summer wheat).  I always have the best results when I buy my flour in bulk and it is organic.  But since we don’t have a store around here anymore that has those qualifications, I’m forced to use bagged stuff off the shelf.

Ummmm…. I think I just found the culprit.  Actually, that may only be half of the equation because a good loaf of bread also relies on humidity.  Since it is dryer than a bone in our house this time of year humidity is lower than the temperature outside.

Didn’t know that you were gonna have a science lesson today did ya!

But seriously, baking bread has science written all over it.  There are so many factors that you have to weigh in order to produce the ideal result.  And since none of those factors are in my favor right now, I’m throwing in the towel and going back to my tried and true recipe of making white bread for a while.  Oh, there are still those pesky little “equations” that you have to factor in.  After all “white” flour is just fine wheat flour, typically bleached, from which most of the bran and germ have been removed.

I know you’re just dying for the recipe, so here goes:

  • 1 1/3 cups warm water
  • 1 Tbsp butter, softened
  • 1 Tbsp white sugar
  • 1 Tsp salt
  • 3 1/2 cups white flour
  • 2 Tbsp dry milk powder
  • 1 (.25 ounce) package active dry yeast (or 2 1/4 tsp)

If you use a bread machine to make your bread, place the ingredients in the pan recommended by the manufacturer.  If you make all your bread by hand, I applaud you.  If you use your stand mixer to do the dirty work, I’m gonna tell you how I process the dough.

With warm water in the mixing bowl, add butter, sugar and milk powder.  Next, add your flour, salt and yeast.  With dough hook attachment, stir all the ingredients on low/stir for a minute or so to get things mixed up a little.  Amp it up to the low/2 setting and set your timer for 5 minutes.  Walk away and let the machine do the work.  After the 5 minutes is up, remove dough from the mixing bowl and kneed it a couple turns to form in a ball.  If your dough appears a little “wet”, put a little flour on your counter and kneed it into the dough for a couple turns until it is not longer sticky.  Please, please try not to add too much flour or you’ll get a heavy loaf.

Dough

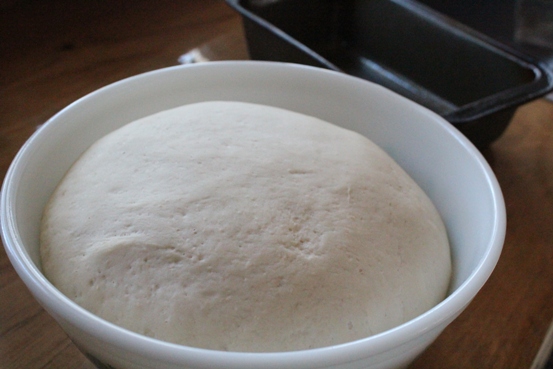
Grease your bowl really good and wipe your dough all around it.  Place the bowl in a warm area and cover with a light cloth for 1 to 1 1/4 hours until doubled in size.

Pan

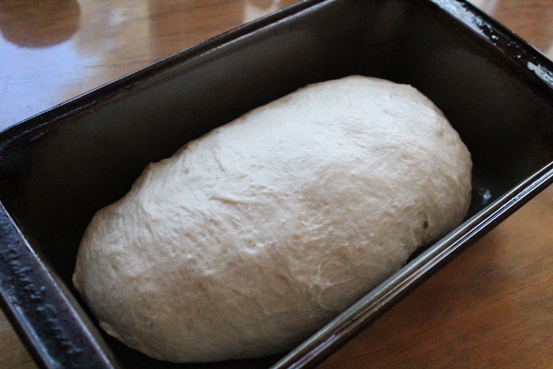
Plop it out of the bowl and kneed a few times to move all that delicious gluten around.  Shape into a loaf and place in a greased loaf pan.  Cover with a light towel and place in warm area for 45 minutes to one hour, or until doubled in size.

Rise

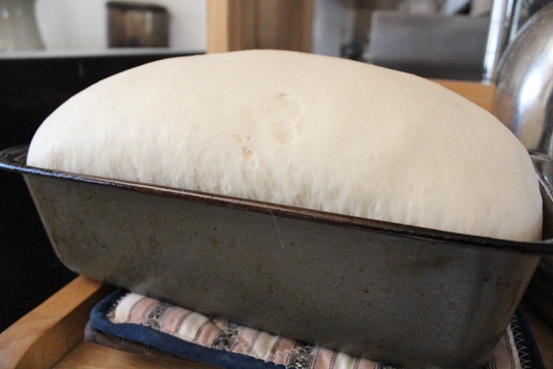
This is the point where I get really excited.  See how the dough is a couple of inches past the rim of the pan?  THIS is what a good pan of bread dough looks like.

Bake at 350 degrees for 25 to 30 minutes until golden brown and bread sounds hollow when tapped.  Immediately remove from pan and cool on wire rack.  I like to rub the top with butter while it is still hot so that the top crust isn’t so crunchy, but that is optional.

Bread

My mouth is watering just looking at it.  There is nothing that compares to the smell of fresh homemade bread.  Restraint is necessary at this point because you just want to slice off a big hunk of this bad boy, slather it with butter and eat it all in one sitting.  And you could do that (who and I to judge) but it’s best to let it cool completely before slicing it.

Yes, baking your own bread is time consuming, but the rewards are fantastic!

Oh, and wanna know how much it cost to make?  $1.40.  You can’t buy a decent loaf of bread now-a-days for that price.  PLUS, there are no hidden additives or preservatives, unlike that crap stuff on the store shelves that may look pretty but that’s just the wrapping.  Taste is where it’s really at.

And believe me, once you taste this bread you’ll realize what you’ve been missing out on.